Importing data into CareHQ
The most common reason clients import data into CareHQ is to transfer data from an existing CRM or set of spreadsheets, for example when setting up your account or adding a newly acquired care home. But there are other reasons you might want to import data on an ad hoc or regular basis.
In this article we provide a step-by-step guide for importing data into CareHQ.
If you're moving to CareHQ then we'll help you set up and import existing data all within the cost of your subscription. If you have questions about transitioning from an existing application then please get in touch.
Selecting the type of data you want to import
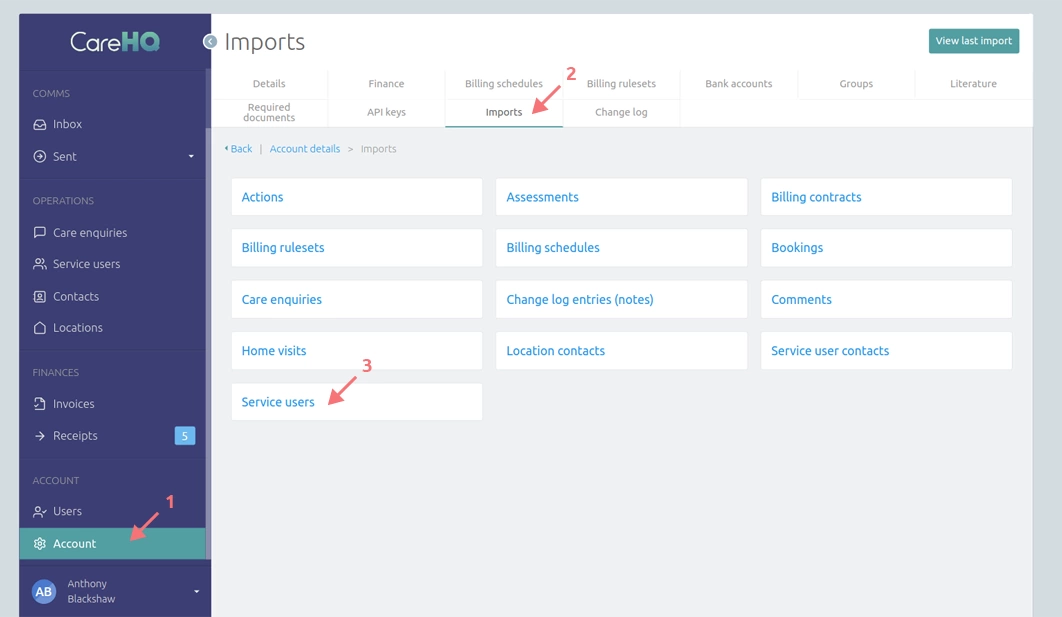
- Select Account from the primary navigation.
- From the tabs at the top of the page select Imports.
- Within the grid view, select the type of data you would like to import, for example Service users.
Downloading data templates
Templates provide a streamlined approach to importing your data.
- Select Download template to initiate downloading the template zip file, and save the file to your Desktop or a memorable location.
-
Extract the downloaded zip file which will expand to two files:
- base_template.csv - A comma separated document that is pre-populated with column headers.
- documentation.csv - A comma separated document with specifications for each column within the base_template.csv, including how data within the column should be formatted.
Populating data templates
Open the base_template.csv file in your preferred spreadsheet application. In the document you will find a row of cells filled with headers for the columns of data.
Explanations of the column data can be found in the accompanying documentation.csv file. Populate the base template file with the records you want to import into CareHQ and then save it out as a CSV document with a memorable name, for example service_user_records_oak_house.csv
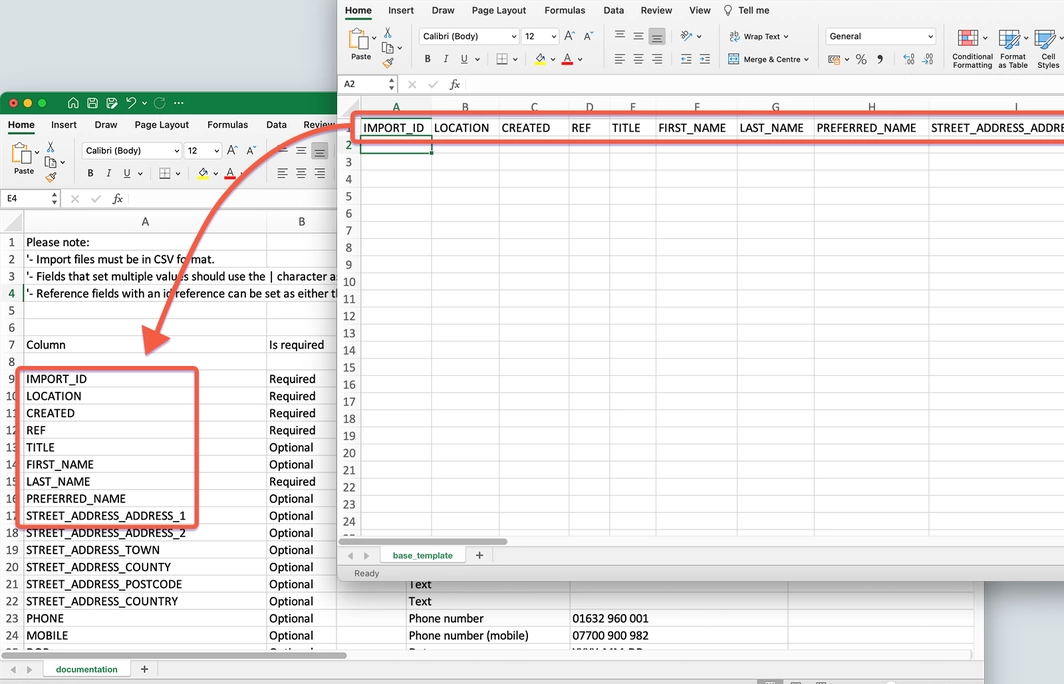
The first column in any base template is the IMPORT_ID column, this is typically populated by the unique ID of the record of the system you're importing from. CareHQ will use this value to determine if a record being imported already exists on CareHQ and if so, whether to ignore it or update it (depending on the behaviour you requested for the import).
Importing your data
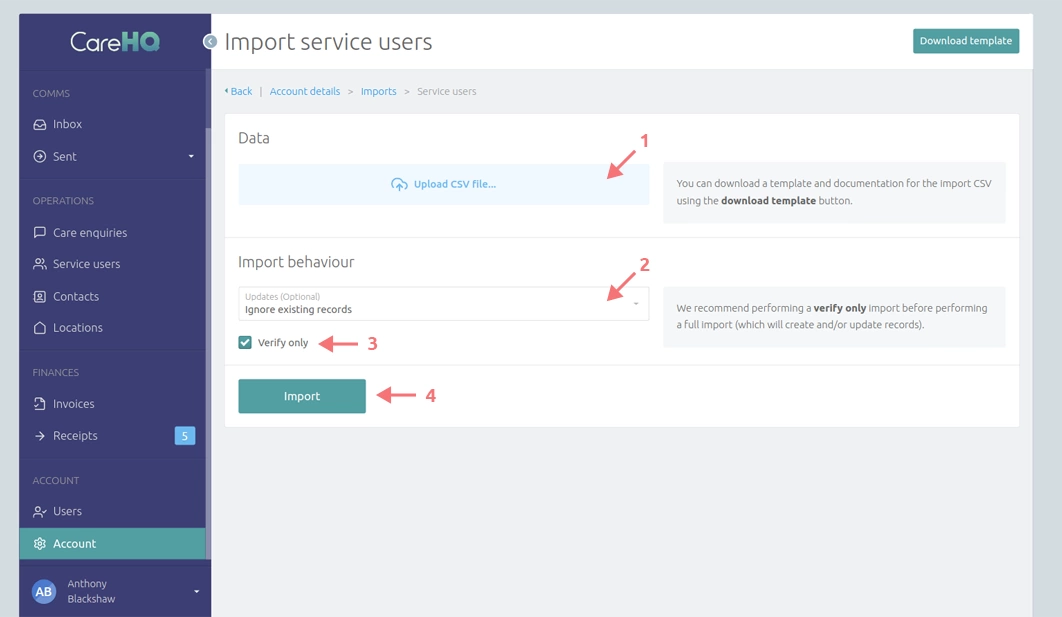
- Within the Data section of the Import page, select Upload CSV file...
- By default only new records are imported and any records you import that already exist on CareHQ will be ignored. If you want to update existing records change the select value in the Updates field to Update existing records.
- By default the Verify only field will be checked. In verify only mode the import will test the data you are importing is valid but it won't attempt to import any records. To import your records make sure the Verify only field is unchecked.
- Select the Import button to start the import process.
Checking import progress
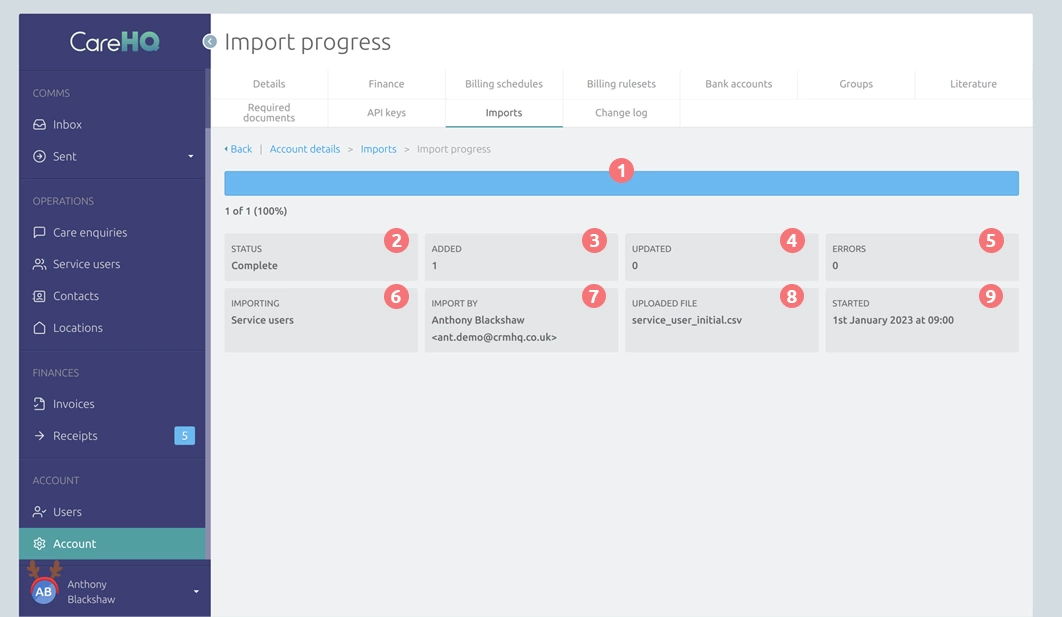
Once the system has started to import your data the page will provide you with progress updates, including:
-
Progress Bar - A visual representation of how many data records (rows) have been processed.
- Under the progress bar you will find the number of records processed next to the count of total records to process.
-
Status - The current state of the importer.
- Pending - Your data is in a queue waiting to be processed (imports typically take less than a minute to start).
- Active - Your data is being processed.
- Complete - All records have now been processed and the import is complete.
- Cancelling / Cancelled - You've requested to cancel the import.
- Added - The amount of records that have been added to CareHQ.
- Updated - The amount of existing records in CareHQ that have been updated.
- Errors - The amount of records that were found to contain errors during the import.
- Importing - The type of data that is being imported.
- Import by - The user that initiated the current import.
- Uploaded File - The filename of the CSV file currently being imported.
- Started - The date and time when the import started.
If at any point you want to cancel your import, select the Cancel button displayed at the end of the progress bar. The status will initially change to Cancelling and then to Cancelled, at which point you can attempt a new import. Any record imported before you opted to cancel the import will remain on CareHQ.
You can leave the import progress page at any time and your import will continue in the background. To return to check on your import select Account from the primary nav, select the Imports tab and then select the View current import button.
Understanding errors
When transferring data between systems it's common for there to be some errors in the process. For example CareHQ may require a field that was optional in the application data which is being transferred from, or the format of a data field or validation rules may vary between CareHQ and the data source.
For this reason we recommend initially running a test (verify only) import to identify any errors in your data. When performing a Verify only import your data is evaluated for errors but no records are inserted or changed. After correcting any errors within your data it's good practice to repeat the process and verify your data again until no errors are identified during the import process. Once you're confident your data is error free, perform the import once again, but this time with the Verify only field unchecked, so that your records are added to CareHQ.
If records within the CSV file you uploaded to CareHQ have errors, they will be flagged in real-time during the import process:

-
ERROR ROW / 2 #1000 - The row that the data is from and its associated IMPORT_ID.
- The error is flagged on row 2 and its IMPORT_ID is 1000.
-
FUNDING_TYPE: This field is required - An error message.
- The FUNDING_TYPE field is empty, when it should have a value.
In this particular example fixing this issue is as simple as finding the second row of the CSV data, and then finding the FUNDING_TYPE field, then updating the field value with one of the valid choices which can be found in the documentation.csv: private, local_authority, local_authority_top_up, chc, chc_lifestyle, block_bed, dta_spot, not_sure.
Import limits
- Users can only perform one import at a time. This limit is applied to ensure CSV data files are uploaded one at a time consecutively.
- There are no set limits on the number of records that can be imported in a single import; we frequently import up to 100,000 records at a time.
- If you are planning on importing more than 100,000 records and are not on dedicated hosting then please let us know in advance.